
In this article, I will explain how I built the Deep Zoom Obama project. It was developed in Silverlight 2 Beta2, uses Deep Zoom and is hosted on Silverlight Streaming (Microsoft’s free 10GB hosting service). It uses, of course, Deep Zoom to display a very large mosaic image of Barack Obama constructed from over 12,000 individual images of his supporters.
So how was it done? Read on young Skywalker.
Step 1: Get 12,000 supporter images
 That reminds me of that old Steve Martin bit about how to be a millionaire and never pay taxes. “First…”, he says “get a million dollars”. When you build a mosaic as large as the one I wanted to built, you need a lot of images. Maybe not a million, but I figured I would need many many thousands. I decided to use avatar images of Barack Obama supporters from the campaign’s web site. But navigating to a supporter page, right clicking on the avatar and selecting “Save Picture as” would take forever. But as luck would have it, the image files are nice and safe in Internet Explorer’s browser cache folder.
The filenames we need end in “@mx_150@my_150” but to get these, you must visit each individual supporter’s page and I was not about to visit 12,000 individual supporter’s pages. However, each supporter has “friends” and their smaller images are displayed on a particular supporter’s page. These smaller image filenames end with “@mx_30@my_100”.
This is where I used the power of Fiddler, Microsoft’s free debugging proxy. I simply inserted the following code into the OnBeforeRequest function in Fiddler’s CustomRules.js file.
if (oSession.uriContains("@mx_30@my_100")){
    oSession.url = oSession.url.replace("@mx_30@my_100","@mx_150@my_150");
}
What does this do? When a request is made to download the smaller image, Fiddler alters the request to download the larger image (i.e. the one we need). This allowed me to visit a lot fewer pages to fill up my cache. I found a few supporters with 3000+ friends and viola, I had 12,000 images before I knew it!
Step 2: Build the 10,000 x 10,000 Mosaic
 This is the cool part and I can’t take the credit for the find. I read a post on Microsoft’s Channel 10 about a mosaic of the Sydney Opera House made up of Virtual Earth images. It was made by the Australian firm SoulSolutions. They used a free mosaic generator called AndreaMosaic to generate their image. It’s not the most visual appealing user interface in the world, but what it lacks in aesthetics, it more than makes up for in raw power.
I played around with the settings until I found some that worked for my project. The result was a 10,000 x 10,000 pixel file. I was surprised at how fast the mosaic was generated (less than 20 minutes).
Step 3: Build the Multi Scale Images
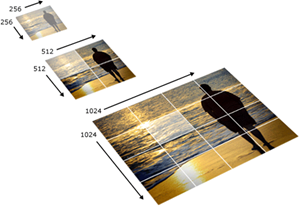
First a little background on the Deep Zoom file format. An image is broken into many small pieces of varying resolutions. As you can see, only a small piece of the hi resolution image is downloaded (shown highlighted in the example above) as one zooms into an image. More detail of the Deep Zoom file format can be found on MSDN.
 These multi scale images are built with a free tool from Microsoft called Deep Zoom Composer (shown below). Armed with the mosaic image and a few other hi-resolution images, it was time to built the images, but I wanted to add a bit of a twist. Deep Zoom has the concept of sparse images where parts of an image has a higher resolution that others. I would use this to place hi resolutions tiles into the mosaic. For example, if you zoom into the pupil in either eye, a completely different hi resolution picture can be zoomed into even further.
 You can think of sparse images as the spec of dust from Dr. Seuss’s Horton Hears a Who! In the book we learn that when you look at it from a far, the spec appears as just that, a spec of dust. But if you zoom in deep, you find a whole other world living on that spec. This is the concept behind sparse images.
I’m not going into great detail on how to use Deep Zoom Composer (as a great tutorial can be found on the Expression Blend blog). But, in the screen shot above, you can see how you can arrange images on top of other images at different zoom levels. The Image of Obama waving is actually a spec in Obama’s left eye when viewed from a far.
Step 3: Build the Silverlight Application
This is where the new version of Deep Zoom Composer was a lot of help. Not only does it slice up your images into tasty browser sized morsels, it actually generates a Visual Studio solution with two projects: the actual Silverlight application (i.e. your XAP file) and a web project test bed.
If you are satisfied with the generated XAML, and it is probably fine for some applications, you are done. The generated code-behind now has support for mouse scroll-wheel zooming, but you may want to tweak the code and/or XAML to suit your needs. For example, I removed from the XAML the pesky border and 10 pixel white margin as well as any height and width as I wanted the hosting application to be able to specify these values.
The key to Deep Zoom is the MultiScaleImage object defined in the XAML.
<MultiScaleImage x:Name="msi"/>
The code generated by Deep Zoom Composer is not the most elegant in the world. I’ve streamlined it a bit and modified it to capture the mouse when the user is dragging. This allows the user to move the mouse outside of the application area and retain the drag state.
Here is my modified code in the constructor of Page.xaml.cs. Pay attention to the calls to CaptureMouse and ReleaseMouseCapture.
this.MouseLeftButtonDown += delegate(object sender, MouseButtonEventArgs e)
{
    mouseButtonPressed = true;
    mouseIsDragging = false;
    dragOffset = e.GetPosition(this);
    currentPosition = msi.ViewportOrigin;
};

this.MouseLeftButtonUp += delegate(object sender, MouseButtonEventArgs e)
{
    mouseButtonPressed = false;
    if (mouseIsDragging == false)
    {
        if ((Keyboard.Modifiers & ModifierKeys.Shift) == ModifierKeys.Shift)
            ZoomFactor = 0.5;
        else
            ZoomFactor = 2.0;

        Zoom(ZoomFactor, this.lastMousePos);
    }
    else
    {
        mouseIsDragging = false;
        this.ReleaseMouseCapture();
    }
};

this.MouseMove += delegate(object sender, MouseEventArgs e)
{
    if (mouseButtonPressed)
    {
        if (!mouseIsDragging)
        {
            this.CaptureMouse();
            mouseIsDragging = true;
        }
    }
    this.lastMousePos = e.GetPosition(this.msi);

    if (mouseIsDragging)
    {
        Point newOrigin = new Point();
        newOrigin.X = currentPosition.X - (((e.GetPosition(msi).X - dragOffset.X) / msi.ActualWidth) * msi.ViewportWidth);
        newOrigin.Y = currentPosition.Y - (((e.GetPosition(msi).Y - dragOffset.Y) / msi.ActualHeight) * msi.ViewportWidth);
        msi.ViewportOrigin = newOrigin;
    }
};

new MouseWheelHelper(this).Moved += delegate(object sender, MouseWheelEventArgs e)
{
    e.Handled = true;
    if (e.Delta > 0)
        ZoomFactor = 1.2;
    else
        ZoomFactor = .80;

    Zoom(ZoomFactor, this.lastMousePos);
};
Step 4: Place the Application on Silverlight Streaming
Now that you have your application, where will you host it? Remember that it could go viral and get millions of hits and even more in image downloads. Microsoft has a free service to host your Silverlight applications. It’s called Silverlight Streaming.
In order to host your Silverlight 2 application, you need to add a manifest.xml file that describes your application. Here is the manifest file that I used:
<SilverlightApp>
  <version>2.0</version>
  <source>DeepZoomObama.xap</source>
  <width>480</width>
  <height>480</height>
  <background>white</background>
  <isWindowless>false</isWindowless>
</SilverlightApp>
You can change the source element to fit your needs. Place the manifest.xml file into the ClientBin folder of your web project. Then generate a ZIP file of the content of ClientBin.
Go to silverlight.live.com and click on Manage Applications then Upload an Application. You will be asked to give your application a name (mine was of course DeepZoomObama).
Next you will upload your application. Browse to the ZIP files that you created and click Upload. This process will take some time depending on your Internet connection speed.
My application was about 43MB, but Silverlight Streaming gives you 10GB of storage. That’s a lot of Deep Zoom applications!
Step 5: Built a suitable presentation Web Site
This was the most trivial aspect of the while project. I hand coded the HTML, CSS and Photoshopped all of the images. The one most important items however was including the Silverlight Streaming application that we built in the last step.
Here is (basically) the HTML that I inserted. If you want to host the new Deep Zoom Obama Silverlight application on your web site or blog, copy and paste the following HTML code.
<iframe frameborder='0' scrolling='no'
style='border:solid 1px #999999; width:480px; height:480px'
src="http://silverlight.services.live.com/invoke/52059/DeepZoomObama/iframe.html">
</iframe>
Conclusion
Building a Deep Zoom application is fun and extremely easy once you’ve done it a few times. The mosaic also really enhances the “wow” effect and is not that much more work.
Here is a recap of the tools used in this project:
5 comments:
- Unknown said on July 7, 2008 at 2:16 PM ...
-
This is awesome! Thanks for doing this. --
--Rob - chris said on August 13, 2008 at 3:54 PM ...
-
Question:
you've created the big mosaic image and then, using deepzoom composer you arranged manually all the images? :| - Unknown said on March 24, 2018 at 1:59 PM ...
-
She knew that she would weep once Download Youtube Videos more when she saw the form, soft hands folded in loss of life; the face that had under no circumstances looked save with love upon her, fixed and grey and useless.
- Solusi Sehat dengan Herbal said on October 3, 2018 at 8:18 PM ...
-
This article is interesting and useful. Thank you for sharing. And let me share an article about health that God willing will be very useful. Thank you :)
Obat Pelancar Haid paling Ampuh
Cara Menghilangkan Bopeng Bekas Jerawat
Cara Membersihkan flek di Paru-paru
Cara Menyembuhkan Nyeri Punggung
Pengobatan Alami menyembuhkan Sangkadi
Cara Menghilangkan Bekas luka
Cara Cepat Mengatasi Iritasi Kulit - jasonbob said on October 13, 2020 at 4:09 AM ...
-
yeezy
curry shoes
moncler outlet
stone island clothing
yeezy supply
giannis antetokounmpo shoes
golden goose sneakers
retro jordans
kobe 9
hermes belts
Post a Comment